In a previous article we showed how an own TTN LoRaWAN gateway can be built using a Raspberry Pi. This article shows how a LoRaWAN device can be built. There are multiple options, however we use an Adafruit Feather.
There are multiple tutorials available. For example Adafruit provides a detailed guide.
Adafruit Feather
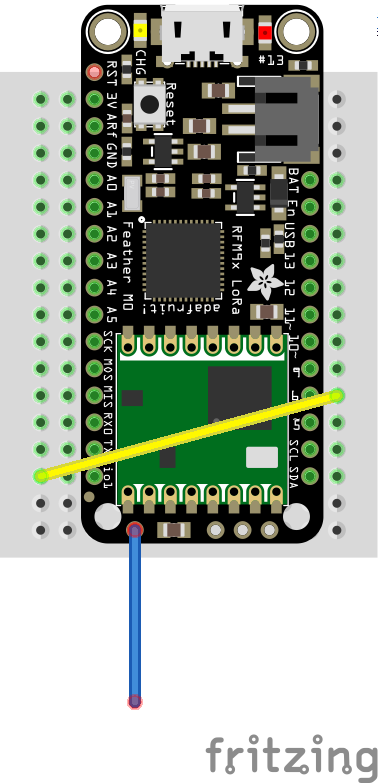
The Adafruit Feathers are a family of micro-controllers. All share the same layout such that extensions in the form of so called Wings can be used. Some Feathers already contain sensors or communication modules. For example the Adafruit Feather M0 is also available with a LoRaWAN communication module.
All Feathers can be programmed using the Arduino IDE such that it is very easy to get started. Consequently the Adafruit Feathers are a good solution for many IoT solutions.
The Feather M0 is almost ready to use. The only necessary steps are to add a jumper wire and to solder an antenna to it. For the 868 MHz frequency range a simple wire with a length of 8,2 cm is sufficient as antenna. For first tests the Feather M0 can be connected via its USB port for power supply.
Create a TTN Application
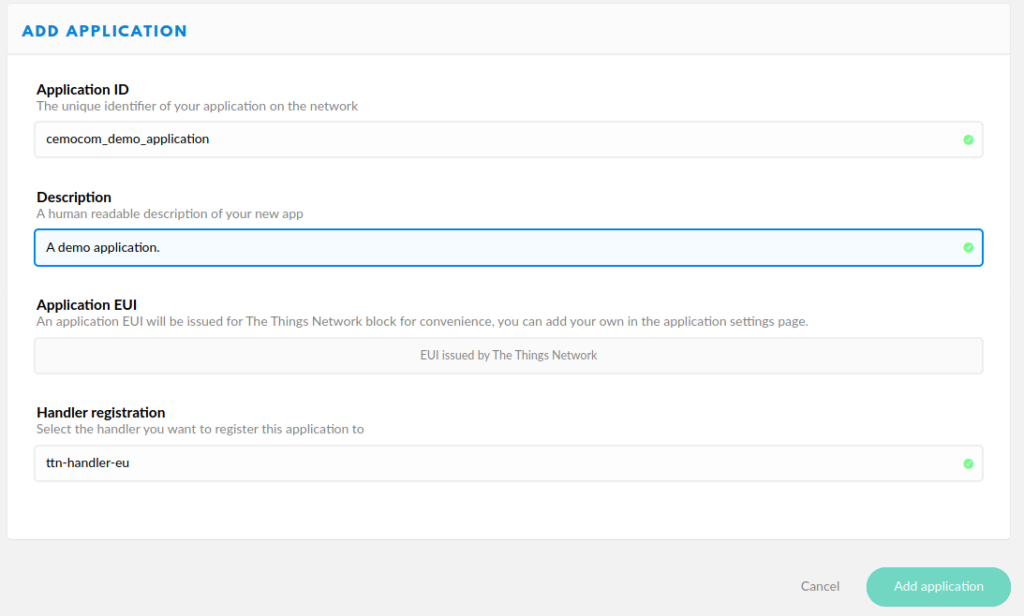
The next step is to create a new TTN application. This can be done by logging in to https://console.thethingsnetwork.org. After logging in select applications and create a new application. A dialog opens where the details of the new application can be entered.
After creating the application devices can be added to the application a new dialog is shown that lists all details about the application.
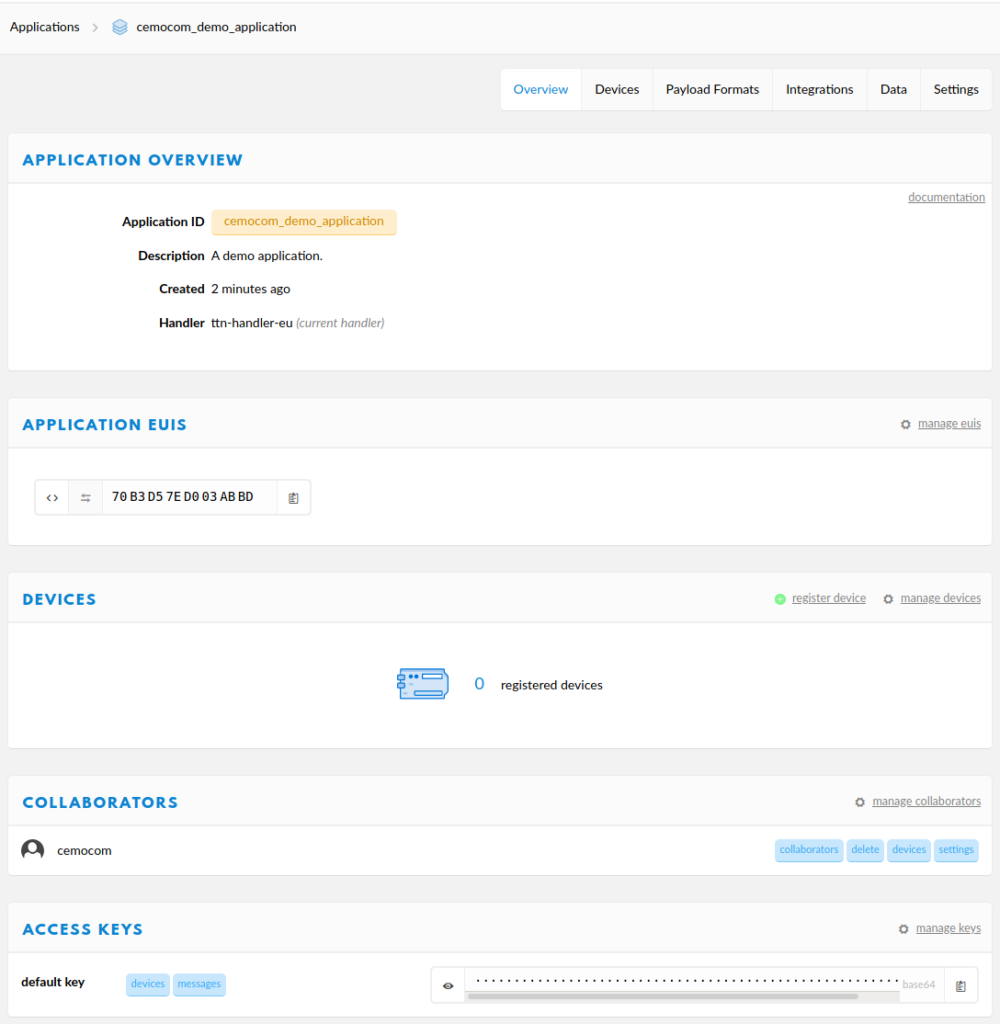
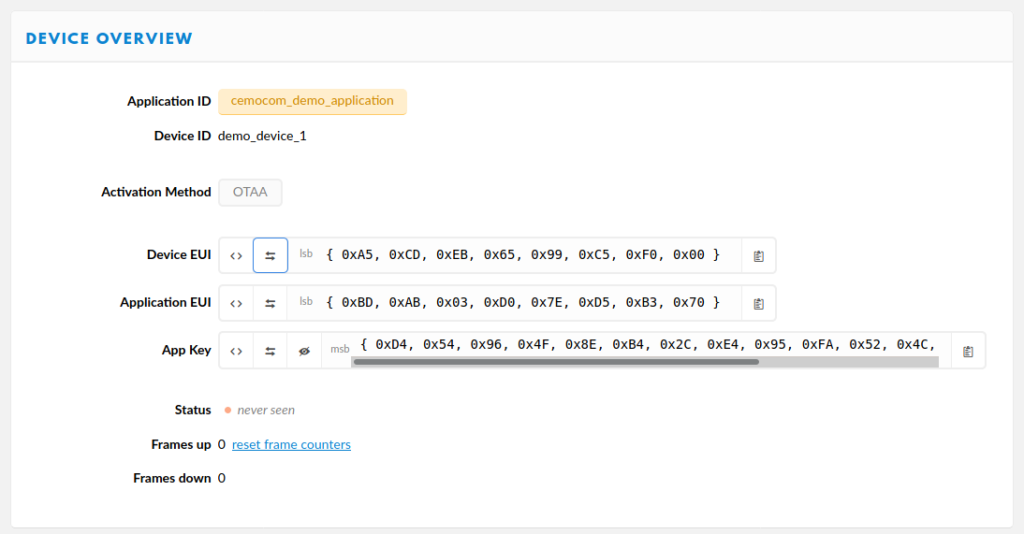
This dialog also shows all devices connected to the application. As we just created the application there are no devices available yet. But we can register a new device. For the registration we have to provide application wide unique device identifier and the network wide unique Device EUI. The Device EUI is a eight byte sequence. Use the identifier that was included with your Adafruit Feather. Pad with zero bytes if necessary. If the Device EUI is not know there is also the possibility to generate a random one.
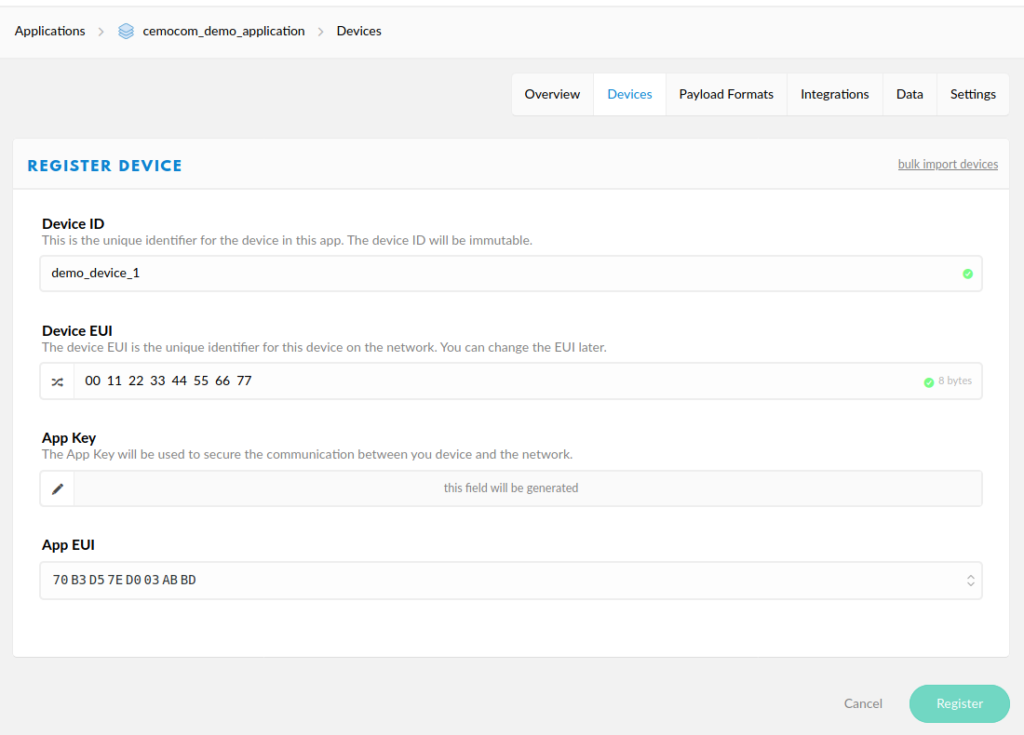
In the next dialog the relevant information to finally activate the device is shown. The Device EUI, Application EUI and App Key can be directly displayed in the correct format. Important for the next steps is that Device EUI and Application EUI are provided in LSB order.
Program the Adafruit Feather
The complete set-up of the Arduino IDE is skipped in this article. The most important steps are shown in the Adafruit tutorial. We use the MCCI’s arduino-lmic library to communicate with the TTN network, which can be installed using the library manager of the Arduino IDE. In the example below we do not transmit useful data, but only randomly generated data. In real implementations the function void readValues(unsigned char *vals) (line 182) could be used to write meaningful data into the variable vals.
The Device EUI, Application EUI and App Key from the previous steps have to be copied into the variables PROGMEM DEVEUI, PROGMEM APPEUI and PROGMEM APPKEY, respectively. These variables are located in the beginning of the code. Finally the transmit interval in seconds can be configured via the variable TX_INTERVAL in line 60.
Before flashing the program on the Feather M0, it is necessary to configure the region, i.e. the frequency, that shall be used. This is done in the file lmic_project_config.h located in the LMIC library folder of your Arduino IDE. Simply uncomment the region in which the device shall be used. Make sure that only one region is uncommented.
/*******************************************************************************
   Copyright (c) 2015 Thomas Telkamp and Matthijs Kooijman
   Adapted for Adafruit feather m0 LoRa by Stefan Huber

   Permission is hereby granted, free of charge, to anyone
   obtaining a copy of this document and accompanying files,
   to do whatever they want with them without any restriction,
   including, but not limited to, copying, modification and redistribution.
   NO WARRANTY OF ANY KIND IS PROVIDED.

   This example sends the actual battery voltage, using frequency and
   encryption settings matching those of the The Things Network.

   This uses OTAA (Over-the-air activation), where where a DevEUI and
   application key is configured, which are used in an over-the-air
   activation procedure where a DevAddr and session keys are
   assigned/generated for use with all further communication.

   Note: LoRaWAN per sub-band duty-cycle limitation is enforced (1% in
   g1, 0.1% in g2), but not the TTN fair usage policy (which is probably
   violated by this sketch when left running for longer)!
   To use this sketch, first register your application and device with
   the things network, to set or generate an AppEUI, DevEUI and AppKey.
   Multiple devices can use the same AppEUI, but each device has its own
   DevEUI and AppKey.

   Do not forget to define the radio type correctly in config.h.

 *******************************************************************************/

#include <lmic.h>
#include <hal/hal.h>
#include <SPI.h>
#include <avr/dtostrf.h>

// This EUI must be in little-endian format, so least-significant-byte first.
static const u1_t PROGMEM APPEUI[8] = {};
void os_getArtEui(u1_t *buf)
{
    memcpy_P(buf, APPEUI, 8);
}

// This should also be in little endian format, see above.
static const u1_t PROGMEM DEVEUI[8] = {};
void os_getDevEui(u1_t *buf)
{
    memcpy_P(buf, DEVEUI, 8);
}

// This key should be in big endian format.
static const u1_t PROGMEM APPKEY[16] = {};
void os_getDevKey(u1_t *buf)
{
    memcpy_P(buf, APPKEY, 16);
}

char mydata[16];
static osjob_t sendjob;

const unsigned TX_INTERVAL = 600;

const lmic_pinmap lmic_pins = {
    .nss = 8,
    .rxtx = LMIC_UNUSED_PIN,
    .rst = LMIC_UNUSED_PIN,
    .dio = {3, 6, LMIC_UNUSED_PIN},
};

void printHex2(unsigned v)
{
    v &= 0xff;
    if (v < 16)
    {
        Serial.print('0');
    }
    Serial.print(v, HEX);
}

void onEvent(ev_t ev)
{
    Serial.print(os_getTime());
    Serial.print(": ");
    switch (ev)
    {
    case EV_SCAN_TIMEOUT:
        Serial.println(F("EV_SCAN_TIMEOUT"));
        break;
    case EV_BEACON_FOUND:
        Serial.println(F("EV_BEACON_FOUND"));
        break;
    case EV_BEACON_MISSED:
        Serial.println(F("EV_BEACON_MISSED"));
        break;
    case EV_BEACON_TRACKED:
        Serial.println(F("EV_BEACON_TRACKED"));
        break;
    case EV_JOINING:
        Serial.println(F("EV_JOINING"));
        break;
    case EV_JOINED:
        Serial.println(F("EV_JOINED"));
        {
            u4_t netid = 0;
            devaddr_t devaddr = 0;
            u1_t nwkKey[16];
            u1_t artKey[16];
            LMIC_getSessionKeys(&netid, &devaddr, nwkKey, artKey);
            Serial.print("netid: ");
            Serial.println(netid, DEC);
            Serial.print("devaddr: ");
            Serial.println(devaddr, HEX);
            Serial.print("AppSKey: ");
            for (size_t i = 0; i < sizeof(artKey); ++i)
            {
                if (i != 0)
                    Serial.print("-");
                printHex2(artKey[i]);
            }
            Serial.println("");
            Serial.print("NwkSKey: ");
            for (size_t i = 0; i < sizeof(nwkKey); ++i)
            {
                if (i != 0)
                    Serial.print("-");
                printHex2(nwkKey[i]);
            }
            Serial.println();
        }
        LMIC_setLinkCheckMode(0);
        break;
    case EV_JOIN_FAILED:
        Serial.println(F("EV_JOIN_FAILED"));
        break;
    case EV_REJOIN_FAILED:
        Serial.println(F("EV_REJOIN_FAILED"));
        break;
    case EV_TXCOMPLETE:
        Serial.println(F("EV_TXCOMPLETE (includes waiting for RX windows)"));
        if (LMIC.txrxFlags & TXRX_ACK)
            Serial.println(F("Received ack"));
        if (LMIC.dataLen)
        {
            Serial.println(F("Received "));
            Serial.println(LMIC.dataLen);
            Serial.println(F(" bytes of payload"));
        }
        os_setTimedCallback(&sendjob, os_getTime() + sec2osticks(TX_INTERVAL), do_send);
        break;
    case EV_LOST_TSYNC:
        Serial.println(F("EV_LOST_TSYNC"));
        break;
    case EV_RESET:
        Serial.println(F("EV_RESET"));
        break;
    case EV_RXCOMPLETE:
        Serial.println(F("EV_RXCOMPLETE"));
        break;
    case EV_LINK_DEAD:
        Serial.println(F("EV_LINK_DEAD"));
        break;
    case EV_LINK_ALIVE:
        Serial.println(F("EV_LINK_ALIVE"));
        break;
    case EV_TXSTART:
        Serial.println(F("EV_TXSTART"));
        break;
    case EV_TXCANCELED:
        Serial.println(F("EV_TXCANCELED"));
        break;
    case EV_RXSTART:
        break;
    case EV_JOIN_TXCOMPLETE:
        Serial.println(F("EV_JOIN_TXCOMPLETE: no JoinAccept"));
        break;
    default:
        Serial.print(F("Unknown event: "));
        Serial.println((unsigned)ev);
        break;
    }
}

void readValues(unsigned char *vals)
{
    vals[0] = (unsigned char)rand();
}

void do_send(osjob_t *j)
{
    // Check if there is not a current TX/RX job running
    if (LMIC.opmode & OP_TXRXPEND)
    {
        Serial.println(F("OP_TXRXPEND, not sending"));
    }
    else
    {
        // Prepare upstream data transmission at the next possible time.
        unsigned char payload;
        readValues(&payload);
        Serial.print("Payload: ");
        Serial.println(payload);
        LMIC_setTxData2(1, &payload, 1, 0);
        Serial.println(F("Packet queued"));
    }
    // Next TX is scheduled after TX_COMPLETE event.
}

void setup()
{
    Serial.begin(9600);
    delay(10000);
    Serial.println(F("Starting"));

    // LMIC init
    os_init();
    // Reset the MAC state. Session and pending data transfers will be discarded.
    LMIC_reset();
    LMIC_setClockError(MAX_CLOCK_ERROR * 1 / 100);

    // Start job (sending automatically starts OTAA too)
    do_send(&sendjob);
}

void loop()
{
    os_runloop_once();
}
Conclusion
This article demonstrated the necessary steps to create a new TTN application and connect an Adafruit Feather M0 to it.
The next step would be to consume the transmitted data of the devices. The TTN console provides the possibility for data conversion using small JavaScript scripts. The received data can also be exported to own services, e.g. via MQTT or HTTP. This will be covered in a follow-up article.